Heike`s AugenBlick

Hello and Welcome by Heike`s AugenBlick. Inspirations about Mixed Media Layouts, Cards and much more...Enjoy your time on my Blog.. xoxo Heike

Wednesday, December 26, 2018

Scrap FX DT member post

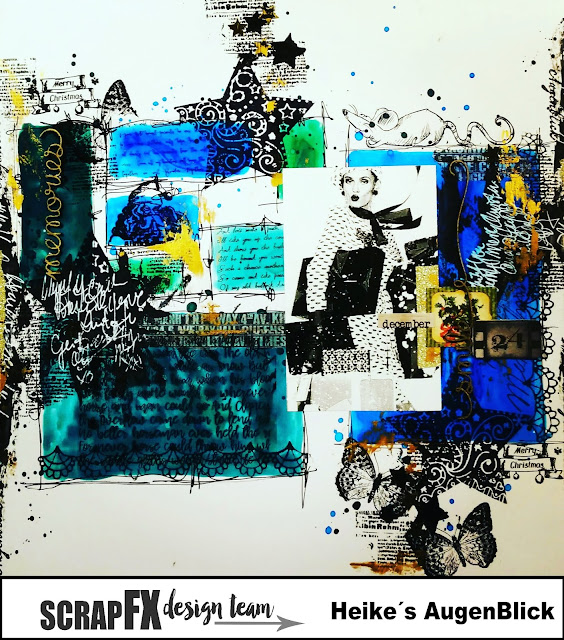
Merry Christmas my dear blog friends

and welcome to my second dt member post on the second Christmas day,

or the second day of the 13th holy days.

I created for you two layouts with the beautiful products from Scrap FX Australia.

Here is the link: scrapfx.

After a four weeks holiday break it was a little bit difficult to get back into

a creative flow, but....... I succeeded.


I started on a 30 cm by 30 cm white cardstock which I covered with two layers clear gesso.
Then I drew the rectangles with help from the ScrapFX stencil.
After my pencil-lines were made, I colored the rectangles with my favorite
ink sprays. sometime I added two layers of ink spray, for a little bit darker result.
Now my always favorite part stamping with waterproof black ink and the stamps from Scrap FX and other companies.
After that I made scribble lines to the rectangles and black gesso spots with my spatula. For my decoration I added washi tape.Then I added
on the black gesso also white scribble lines and for a little bit glamour gold acrylic color.
Then I glued the photo and the Scrap FX chipboards which I also covered with gold acrylic color
and some stickers on the cardstock.
Done!!

Here is my second layout...


I used for my two layouts from Scrap FX:

stencil:

Rectangle Stencil

Polygonic stencil


stamps:

Art Deco Panel stamp

Doodled Star stamp

Harlequin Stamp

Journey stamp


transparency:

Script transparency


chipboard:

Happy & Memories

Laugh & Smile

Square Screen

Last but not least here is my favorite Scrap FX dt member project from 2018..


there was also a video tutorial..


My dear blog readers,
I would like to thank you for reading my post and of course for your lovely
comments. All the best for you and your family in 2019.
xoxo
Heike
- December 26, 2018 No comments:
Email ThisBlogThis!Share to TwitterShare to FacebookShare to Pinterest

Thursday, December 13, 2018

December Scrap fx dt post

Silent night.....

silent night, holy night.

All is calm, all is bright.

Round you virgin mother and child.

Holly infant so tender and mild.

Sleep in heavenly peace,

sleep in heavenly peace.

This is one of the most beautiful Christmas songs.

The song was first performed on Christmas Eve 1818 at St. Nicholas parish church in Oberdorf,

a village in Austria. A young priest, Father Joseph Mohr, had written the lyrics of the song

 ( in German: Stille Nacht) in 1816 in Mariapfarr, the hometown of his father, where Joseph had worked as a coadjutor.

The melody was composed by Franz Xaver Gruber, a schoolmaster and organist.

.
Hello my dear blog readers,

todays layout and dt member work  once again on yupo paper.

My color choice is: Paris, Candy and Amber, Colour Shimmer Dust from Colour Blast.

7 Dots Studio sticker, Versafine black Ink, Posca pen

and the beautiful products from Scrap FX Australia.

Circle border stencil


Circle Stencil


Journey stamp


Nautilus Graphic BLACK


Here is my inspiration layout...


I hope you have a nice Christmas time.

 Maybe you have the time and desire

 to look into my second blog post for Scrap fx.

 Until then, all the best and blessed Christmas for you and your family.

xoxo
Heike


- December 13, 2018 1 comment:
Email ThisBlogThis!Share to TwitterShare to FacebookShare to Pinterest

Tuesday, December 4, 2018

December Art Playground DT-member inspiration.

Hello my dear blog readers,

it`s time to present you my last DT-member inspiration for the blog "Art Playground"

I step back as DT member, this  was such a honor to create in an amazing team.

 Sharon I wish you all the best for

your stunning challenge site.


The Art Playground challenge is based on a color mood board and a word- theme.

Image may contain: food

This month is the word- theme "click,click"

Actually I am not a photographer with a fancy expensive equipment.

I have my mobile phone which includes an amazing camera and that is absolutely enough for me.

 Most of my layout photos are taken from magazines, free down load sites,

old family photos, Tim Holtz photo images,

or beautiful photos from friends, neighbors or crafty-friends.

The only thing  I do then is to copy the photos in the copy-shop, to use some photos more often.


I created my layout on yupo paper, with Lindys Spray, black Archival Ink and stamps.

The big yellow splatters are done with Alcohol Ink and Alcohol Lift Ink.

To see whats going on, on my background I love to use minimalist embellishment.

This can be little pieces of design paper and word stickers.


Here is my inspiration for you.


I hope I could inspire you to play this month  with the challenge by APG!

Here is the link: artplaygroundblog.


For my last DT member page I was inspired by the Christmas story behind Maria and Joseph.

They had to leave their hometown for a census, after the birth of Jesus

they had to flee from violence and war. Only years later, they were able to return to their homeland.

So I have to think of all the mothers and children who are in a similar situation.

How would it be nice, if we could all together, live in peace, harmony and love, on

our beautiful earth.


The reason why I used a photo from a mother and child is to honor

 all the mothers and her children who have to leave their hometown.


Meaning green color: hope, peace, death and rebirth.

Meaning yellow color: optimism, life and light.

Meaning pink color. unconditional love and care.

Symbol leaf: fertility, growth and renewal.


My dear blog readers, that was my last project for you and this design team.

I will be looking forward to new adventures.... maybe also to new design teams.

But first I will study the abstract art, which I would like to contribute to my projects.

I wish you a beautiful Holiday season.


Until next time.
xoxo
Heike


- December 04, 2018 2 comments:
Email ThisBlogThis!Share to TwitterShare to FacebookShare to Pinterest

Saturday, December 1, 2018

December layout for Scrap The Boys by Heike

My dear blog readers,

the Christmas time is the most beautiful time of the year.

With so many heartfelt traditions, dreaming of the first snow, drinking hot chocolate,

sitting next to the warm fire place and enjoying all the Christmas spirit around us.

This time is so beautiful indeed.

No matter the hectic with wrapping the Christmas gifts, planning the Christmas dinner.

One thing is for sure, one thing never changes.

The love of family surrounds us and attaches itself to every beautiful moment.

Cherish these memories. Memories, which you can share with us,

on our December Scrap The Boys challenge.

Here is the link to STB: scraptheboys.blogspot.

With the theme. "Naughty and nice"

No automatic alt text available.


I created a layout on Yupo paper (which is in the moment my favorite layout paper)

Take care with creating on Yupo paper. It takes time to create a layout on Yupo paper,

because the paper is actually plastic and it would melt under the heat from the heat tool.

so the drying time can be very long.

If you keep that... then it`s an amazing product to work with!!


I used for the coloring Distress refill ink, forest moss and tumbled glass.

Ecoline Nr. 334.

Posca pen.

Unity stamp company stamps.

Washi tape.

Archival Ink black.

and Tim Holtz photo image.

I created a simple and easy page for you as inspiration.

And I think it`s already in the direction of abstract art... What do you think?

Here is my page for you...


With tears in my eyes, I say goodbye to the design team from Scrap The Boys.

After many, many years in this amazing team it`s time to step back.

I need more time for myself and my new passion the abstract art,

which I will more understand, study and combine in my own art.

That does not mean that I will not create in design teams anymore..oh no !!

I`ll see what 2019 hold for me.

Dear Rachel, thank you so much for all your work behind this challenge blog.

I enjoyed to create with you in the same team.

Dear DT member colleagues, nice to meet you on this challenge site.

Have fun with the upcoming challenge, all the best for 2019.

I love you all!!

My dear blog readers, thank you so much for visiting my blog post.

Enjoy the new month!!

Many Hugs.
xoxo
Heike


- December 01, 2018 1 comment:
Email ThisBlogThis!Share to TwitterShare to FacebookShare to Pinterest

December More Than Words dt-member inspiration....


The best way to 
SPREAD
Christmas Cheer
is singing loud
for all to hear!!!
Buddy the Elf.

Hello,

and welcome to the last challenge  in 2018 on the blog from More Than Words.

Here is the link to the blog from MTW: morethanwordschallenge


This will be also my last inspiration as MTW dt- member.

My time has come to take a step back, I really enjoyed this time

 to create in a very talented friendly group. Thank you to Di for inviting me

to this group, Heather for all the beautiful comments to my blog post about the MTW challenge,

thank you to my design team colleagues, and last but not least to you, my dear blog readers

for visiting my post for this challenge over the years..


This is our December challenge..

Image may contain: text

Believe and stamping...


No automatic alt text available.

Believe in your creative art!!!

This is actually my motivation sentence for 2019.

I have lots of creative dreams. One of them is to study modern art.

I will combine the study in my own scrapbook layouts and art journal pages.

My aim is to grow in my art.

Stamping is the actual creative challenge.

Now this was easy for me... I stamped a lot on my art journal page, which I love, love, love.

I used on my art journal page: 

Ranger Distress Ink and Oxide.
Prima Finnabair stamp.
LaBlanche Germany stamp.
Lost Coast Stamp UK.
Hero Arts stamp.
Posca pen.
TCW stencil.

Make sure to visit the MTW challenge blog for all the DT member projects.

There are so many fantastic inspirations to see.

My dear blog readers I wish you all the best for the upcoming holiday season.

Until next post.

xoxo
Heike


- December 01, 2018 No comments:
Email ThisBlogThis!Share to TwitterShare to FacebookShare to Pinterest

Monday, November 26, 2018

November Scrap fx DT work

Hello everyone,

welcome to my second DT member inspiration for the company Scrap fx .

Here is the link: http://www.scrapfx.com.au/blog/

I created for you as inspiration another altered-fabric-paper book page.

I love the transparency and chipboards as finishing touch on my projects.

I also created for you a Halloween layout.

Lets start...


and my Halloween layout.


I used from Scrap fx:
chipboards

Never Forgotten

Antique Oval frame

Art Nouveau Flourish

#beach

Fright Night

stamps

Art Deco Panel stamp

Harlequin Stamp

Lace Corner stamp

Scratchings & Scribble stamp

silhouette
.

Spider Flower BLACK

Surfer silhouettes

transparency

Dream transparency

Feathers & Lace transparency

Tractor & Truck Charts


I also used.
Golden acrylic.
StazOn Ink.
Archival Ink.
Gold folie.
Tim Holtz photo images and word stickers.
Hein design embossing powder.
Posca pen.

I hope you feel a little bit inspired to use some of the awesome

products form Scrap fx on your projects.

Have a beautiful day.

Until next time.

xoxo
Heike


- November 26, 2018 No comments:
Email ThisBlogThis!Share to TwitterShare to FacebookShare to Pinterest

Thursday, November 15, 2018

Scrap Fx Australia DT work November


Hello my dear blog readers,

I am back from my morning hike with Mister Ben.
what a beautiful season.

the days are dyed in a soft gray tone,

 the rain is glittering like diamonds on the night sky.


Impression from my hike.

Anyway...


Here are  my DT projects for Scrap FX Australia.

Here is the link: .scrapfx.


Our November  theme is: vintage and heritage..


I created a vintage page for my new stitching-fabric-paper art journal book.

The idea came from the artist Lorrie Marie Jenkins.

Here is the link to her blog site:

Lorrie Marie Blog


 I am a collector of old and beautiful quilt fabric,

also laces and old tablecloths, old books and post stamps.

I think that is a good basic to start my new adventure.

I created a page with photos from my mother for the front cover.

But I will add my cover after finishing my insert pages.

That photo in the middle is from 1941 and the little photo is from 1951.


I started with adding fabric on a cardboard .
my cardboard is 13 cm by 20 cm.


After drying from my glue, I added white Gesso with a dry brush.
I also stamp with white Hero Arts Ink and a scrip stamp.
For the vintage look I added randomly Vintage Distress Ink.
My next step was embossing.
 Only the edges with Seth Apter new baked texture in Patina Oxide,
and for the finishing touch vintage wax from Finnabair.


 At this point, I still assumed that, I would hang this art on the wall.
That`s why I here created a kind of wire hanging.....But!!
That was the same time when I met Lorrie on her YouTube channel.
So I changed my first thought: this piece of art will be my cover for my new book.


My next step is creating a layer from paper, fabric, washi tape, post stamps and lace.
With randomly stitching.


I glue  this beautiful layering down on my fabric cardboard.
 Then I cut a photo copy from my mothers photos
 and glue it also on my fabric -paper layering.
Tim Holtz sticker for my  embellishment.
For an altered look I added Seth Apter bees wax baked texture embossing powder on my photo.


Unfortunately I accidentally deleted the next photo, but here I describe what I have done.
I painted the title of a chipboard from Scrap FX  called Photos of the Past with Distress paint in the color fired brick. My frame from Scrap FX is embossed with Sept Apter baked texture patina oxide.
Last but not least I also embossed the little photo from my mother with bees wax from Seth Apter.


I used from Scrap FX.

Antique Oval frame

I added only the under frame.

Photos of the Past


That was my cover but I also created my first pages.
Of course in vintage grungy style.


This painting is an old one, done in 2014 on a vacation in France.
I love to paint in the old Masters style. That means dark background.
On the bottom from the painting I glue washi Tape and a piece from the Scrap Fx transparency sheet.


The beautiful chipboard from Scrap Fx  and another piece from the Scrap Fx transparency
in combination with orange bordeaux and dark brown color looks so cool!!
.

My title from Scrap Fx with gray color and vintage wax, also another pieces from the transparency sheet.

My altered tee bag is such a lovely  embellishment on my site.


And my second page in bordeaux  and vintage green color with photos from Tim Holtz.


Here I added with a stencil from Scrap Fx an interesting element on my background.


For the perfect balance on my page I decided to color my chipboards from Scrap Fx
always in the same color, gray acrylic from Amsterdam with a touch of vintage wax from Finnabair.


Now I think  that is a very beautiful begin on my new adventure..

I used from Scrap Fx:

Boho frame

Timeless Memories

Dream transparency

Feathers & Lace transparency

Soccer chipboard man.

Vine Leaf Corners


I will show my DT member projects on the challenge site Art Journal Journey.

Here is the link: art-journal-journey.

Erika from the blog BioArtGal hosted the November theme "Vintage or Modern"

My dear blog readers, I hope I could motivate you a bit to use fabric and paper on your art.

Who knows maybe you´ll drop by when I post my second dt member inspiration for the Company

Scrap Fx Australia.

Until then.
xoxo
Heike


- November 15, 2018 11 comments:
Email ThisBlogThis!Share to TwitterShare to FacebookShare to Pinterest

Monday, November 5, 2018

November dt member layout for Art Playground.


Hello my dear blog readers,

and welcome to the new challenge on the blog from Art Playground.

Here is the link: artplaygroundblog

Our November mood board with the colors pink, bordeaux and green

and the gorgeous theme "finishing touch" or " never ending story"

inspired me to create a layout in mixed media style.

Image may contain: flower, plant and nature

But first my description over finishing touch.

Did you know...

that at the  official exhibitions in the nineteenth century the artists would give a finishing touch to their  art works by varnishing them in the company from invited guest, buyers and sponsors.

This was always a day before the official vernissage opens.

But also in the current time you can see that the finishing touch is applied...

I,  for example, have my own way to give my artwork  my so-called final touch.

And that is: I put my artwork on an easel. Then I step back and sit on my favorite armchair,

with a view at the easel. In this way I try to find out where I still have something to add.

For example: splatters, glitter, color or stamp-images...

This approach takes sometimes more time than creating a page.

 And than I think again and again that many old masters paint a canvas in a day

 but the so-called final touch could sometimes drag for months.

I would like to encourage you to delay the process of your finishing touch

 over a day. After a certain time, you will be looking at the layout

 in a different way. Only then the right process of the finishing touch begins.

But the best part is that you have created your own story, your own "never ending story"..

Here is what I have created:

Mixed Media Layout...


I used for this layout:
white and black Cardstock,
Finnabair black gesso, art stones, glitter, glas-glitter, glas-beads,
Lindy`s spray,
wire, laces, sisal,
Prima mold embellishments, pearls,
A Cabella stamps,
De stempelwinkel NL,
7 Dots Studio stickers,
Ecoline Nr.100
Coosa crafts gilding wax,
Posca pen black and white,
Photo Nature Magazine.

Maybe I could inspire you with my technique or with my layout.

I would be very happy.

I see you on the blog from Art Playground.

Until then.

xoxo
Heike


Search Resen

- November 05, 2018 5 comments:
Email ThisBlogThis!Share to TwitterShare to FacebookShare to Pinterest

Thursday, November 1, 2018

November More than Words dt member post

Hello everyone,

" Traveling-
 it leaves you speechless,
then turns you into a storyteller."
(Ibn Battuta)

the new challenge on the blog from MTW is all about:

Future and Stars.

No automatic alt text available.
Here is the link: morethanwordschallenge

I decided to create a layout with a quote from Hans Christian Anderson "travel is to live".
That quote described exactly our FUTURE that my husband Jörgen and I have always wishes as we
where a young married couple!! Two years ago our wish come true and we started our future wish.
Rome, Italy, Spain, France, Engeland, South Africa and Australia. I hope we can see so much more from our beautiful world...

For the creative challenge: I painted STARS on the background


No automatic alt text available.

I used for this layout:
Dollar store paper, 
13@rts clear gesso,
Wow black embossingpowder,
Lindys spray,
Prima Finnabair modeling paste, glitter, and glas beads
Liquitex Basics acrylic color,
7 Dots studio sticker,
Posca black pen,


like every month we have generous sponsors... so as:


I hope I could inspire you a bit...
then I would be happy
and maybe you create this month with us!!..

Until then..
Have a beautiful month...
xoxo
Heike
- November 01, 2018 6 comments:
Email ThisBlogThis!Share to TwitterShare to FacebookShare to Pinterest
Newer Posts Older Posts Home
Subscribe to: Posts (Atom)

February challenge 13arts

 Hello and welcome to my February challenge design team inspiration for the company  13arts . This month you can play along with bright bold...

  • #2 Scrap Fx January blog post
     Hello Scrap Fx fans, How are you? We are in the last 10 days of our lockdown. Honestly, slowly I am happy when a normal life can be lived a...
  • Scrap Fx blog post
    Hello lovely people, how are you? Slowly we get more opportunities to move outside here in The Netherlands.  The primary schools are reopene...
  • Scrap Fx Australia DT member blog post
    Merry Christmas my dear blog post reader, probably some of you are already in stress with the last preparations for the festive Chr...

I am a proud designer for Scrap Fx Australia

I am a proud designer for Scrap Fx Australia

I am a proud designer for 13@rts

I am a proud designer for 13@rts

Search This Blog

  • Startseite

I am Heike from Heike`s AugenBlick.

My photo
Heike`sAugenBlick
I am Heike aka Heike 's AugenBlick I was born and raised in Germany . I live with my hubby Joergen in the oldest city of The Netherlands. Together we have four grown up kids (two daughters and two boys). One daughter in law, one son in law and three grand kids. I am an early morning crafter that means I spend my creative hours mostly before lunchtime. My other hobbies are gardening, painting, bicycle, reading books, Tai Chi and snorkeling. Yes that is a lot, I know!! I am a vegetarian, no fish, no meat, no alcohol. I love 80% dark chocolate and a cup of Earl grey with almond milk. Yummy yummy!! I like red and blue clothes and I wear always chunky jewelry. So that is enough from me. If you are interested to follow me on my social media accounts. You can find me always under : Heike 's AugenBlick ( by the way AugenBlick means = moment)
View my complete profile

Blog Archive

  • ►  2023 (9)
    • ►  February (1)
    • ►  January (8)
  • ►  2022 (42)
    • ►  December (5)
    • ►  November (6)
    • ►  October (6)
    • ►  September (5)
    • ►  August (5)
    • ►  July (5)
    • ►  June (4)
    • ►  May (3)
    • ►  April (3)
  • ►  2021 (41)
    • ►  June (6)
    • ►  May (6)
    • ►  April (7)
    • ►  March (12)
    • ►  February (5)
    • ►  January (5)
  • ►  2020 (79)
    • ►  December (5)
    • ►  November (6)
    • ►  October (6)
    • ►  September (9)
    • ►  August (5)
    • ►  July (5)
    • ►  June (8)
    • ►  May (7)
    • ►  April (8)
    • ►  March (11)
    • ►  February (3)
    • ►  January (6)
  • ►  2019 (30)
    • ►  December (3)
    • ►  November (4)
    • ►  October (2)
    • ►  September (1)
    • ►  August (3)
    • ►  July (2)
    • ►  June (2)
    • ►  May (2)
    • ►  April (3)
    • ►  March (2)
    • ►  February (4)
    • ►  January (2)
  • ▼  2018 (61)
    • ▼  December (5)
      • Scrap FX DT member post
      • December Scrap fx dt post
      • December Art Playground DT-member inspiration.
      • December layout for Scrap The Boys by Heike
      • December More Than Words dt-member inspiration....
    • ►  November (5)
      • November Scrap fx DT work
      • Scrap Fx Australia DT work November
      • November dt member layout for Art Playground.
      • November More than Words dt member post
    • ►  October (7)
    • ►  September (5)
    • ►  August (6)
    • ►  July (3)
    • ►  June (4)
    • ►  May (7)
    • ►  April (5)
    • ►  March (6)
    • ►  February (5)
    • ►  January (3)
  • ►  2017 (67)
    • ►  December (5)
    • ►  November (9)
    • ►  October (8)
    • ►  September (2)
    • ►  August (4)
    • ►  July (2)
    • ►  June (3)
    • ►  May (6)
    • ►  April (11)
    • ►  March (2)
    • ►  February (7)
    • ►  January (8)
  • ►  2016 (48)
    • ►  December (2)
    • ►  November (2)
    • ►  October (3)
    • ►  September (5)
    • ►  August (2)
    • ►  July (1)
    • ►  June (6)
    • ►  May (2)
    • ►  April (7)
    • ►  March (5)
    • ►  February (1)
    • ►  January (12)
  • ►  2015 (111)
    • ►  December (7)
    • ►  November (9)
    • ►  October (7)
    • ►  September (9)
    • ►  August (6)
    • ►  July (5)
    • ►  June (12)
    • ►  May (7)
    • ►  April (12)
    • ►  March (10)
    • ►  February (16)
    • ►  January (11)
  • ►  2014 (60)
    • ►  December (8)
    • ►  November (6)
    • ►  October (10)
    • ►  September (7)
    • ►  July (2)
    • ►  June (11)
    • ►  May (16)

Report Abuse

Followers

Translate

Awesome Inc. theme. Powered by Blogger.