DT member post for Scrap Fx
Hello my dear blog readers,
How are you?
September is one of my favorite months of the year.
The nature begins to change color, temperature and weather.
Everything points to the coming autumn.
I love it when it gets dark in the evening, when
the candles and tiled stove burn, so cozy.
Time to sit comfortably on the bench and read a good book,
or create something beautiful.
But anyway.
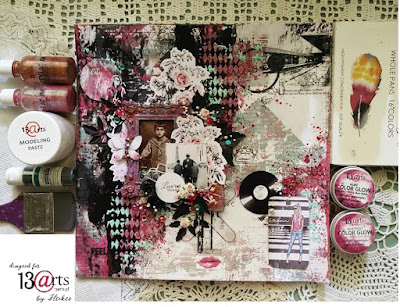
I have for you a beginner photo layout tutorial with a photo from the actor Eddie Redmayne.
Super easy to do.


I started on a white cardstock paper 30 cm x 30 cm
with adding randomly Prima wax in the color vintage gold with help from my palett-knife.

After that I added randomly gold glitter and Stampendous mica fragments on my page.
I used gel medium as glue.

For the chipboards (spiral) I used Lindys spray as color. The colors are: steampunk sepia and
mission bells brown.

After drying, I added prima wax vintage gold and gold glitter to the chipboards.

Then I glued my focal point, i.e. the chipboards and the photo on my background.

For the next step I used "transparency".

For the embellishments I used Prima glass glitter in black and gold sequin,
splattering with the posca black pen and finally pencil lines on the edges.
Done.. that`s easy... or what do you think?

Transparency:
Art Words transparency
Butterflies transparency
Dream transparency
Love transparency
Chipboard:
Spiral embellishment
I am not ready yet...I have another layout for you:
with a children fashion magazine photo.

First I started with a stamp and stencil layer and for this I used:
Diamonds stencil
Orb stamp
Squared stamp
and stamps from my stash. My Ink is Archival Ink from Ranger.
After that I draw with a pencil rectangles and squares with the stencils:
Square Stencil
Rectangle Stencil
after that I colored the rectangles and squares with pink watercolor.
I also added pink splatters.
Now it was time to color my chipboards with black gesso.
My chipboards are:
Vintage frame
Filigree Lace A
After that I glued my two photos on the background
and I added randomly black carbon acrylic with my palett-knife.
With the left over paint I added black splatters.
My next step was glueing the chipboards on my page
and embellishing with transparencies:
Art Words transparency
Butterflies transparency
and for my final touch black posca pen lines.
Done...
last but not least......
I have created an art journal page with a geli print image from the
magazine Elle.

First I started on a mixed media paper 30 cm x 24 cm from canson.
Then I glued with mod podge my focal point, the geli print image, and lots of small
collage paper and tissue paper on my background paper.
Then I added washi tape and stickers to my page.
After that it was time for a a bit of yellow acrylic color.
Now I added stamp images with the stamp:
Number Crunch stamps
Squared stamp
and stamps from my stash.
The next step, black carbon acrylic color was applied with the palett-kife.
For my decoration I used silhouettes:
Magnolia Branch, black
Mandala BLACK
which I outlined with a white posca pen,.
After that I added the transparency:
Dream transparency
At the end I painted a big yellow acrylic number.
Done.
Now my dear blog readers,
that was my first blog post in September.
I hope I could inspire you with my dt member inspiration.
Until then.....
How are you?
September is one of my favorite months of the year.
The nature begins to change color, temperature and weather.
Everything points to the coming autumn.
I love it when it gets dark in the evening, when
the candles and tiled stove burn, so cozy.
Time to sit comfortably on the bench and read a good book,
or create something beautiful.
But anyway.
I have for you a beginner photo layout tutorial with a photo from the actor Eddie Redmayne.
Super easy to do.


I started on a white cardstock paper 30 cm x 30 cm
with adding randomly Prima wax in the color vintage gold with help from my palett-knife.

After that I added randomly gold glitter and Stampendous mica fragments on my page.
I used gel medium as glue.

For the chipboards (spiral) I used Lindys spray as color. The colors are: steampunk sepia and
mission bells brown.

After drying, I added prima wax vintage gold and gold glitter to the chipboards.

Then I glued my focal point, i.e. the chipboards and the photo on my background.

For the next step I used "transparency".

For the embellishments I used Prima glass glitter in black and gold sequin,
splattering with the posca black pen and finally pencil lines on the edges.
Done.. that`s easy... or what do you think?

Transparency:
Art Words transparency
Butterflies transparency
Dream transparency
Love transparency
Chipboard:
Spiral embellishment
I am not ready yet...I have another layout for you:
with a children fashion magazine photo.

Diamonds stencil
Orb stamp
Squared stamp
and stamps from my stash. My Ink is Archival Ink from Ranger.
After that I draw with a pencil rectangles and squares with the stencils:
Square Stencil
Rectangle Stencil
after that I colored the rectangles and squares with pink watercolor.
I also added pink splatters.
Now it was time to color my chipboards with black gesso.
My chipboards are:
Vintage frame
Filigree Lace A
After that I glued my two photos on the background
and I added randomly black carbon acrylic with my palett-knife.
With the left over paint I added black splatters.
My next step was glueing the chipboards on my page
and embellishing with transparencies:
Art Words transparency
Butterflies transparency
and for my final touch black posca pen lines.
Done...
last but not least......
I have created an art journal page with a geli print image from the
magazine Elle.

First I started on a mixed media paper 30 cm x 24 cm from canson.
Then I glued with mod podge my focal point, the geli print image, and lots of small
collage paper and tissue paper on my background paper.
Then I added washi tape and stickers to my page.
After that it was time for a a bit of yellow acrylic color.
Now I added stamp images with the stamp:
Number Crunch stamps
Squared stamp
and stamps from my stash.
The next step, black carbon acrylic color was applied with the palett-kife.
For my decoration I used silhouettes:
Magnolia Branch, black
Mandala BLACK
which I outlined with a white posca pen,.
After that I added the transparency:
Dream transparency
At the end I painted a big yellow acrylic number.
Done.
Now my dear blog readers,
that was my first blog post in September.
I hope I could inspire you with my dt member inspiration.
Until then.....


Comments
Post a Comment